
Introduction
Hi, my name is Justin, and I’m with Pro-Bel Enterprise. Today, I’ll be going over the basics of fall protection design. First things first, let me tell you a little more about myself.
I’m a Junior Designer for our fall protection, and I also work in Business Associate Development. This essentially means it’s my job to arrange our free design service for any eligible projects, which includes most projects within North America.
I’ve arranged designs for projects for everything from retrofitting small schools and new construction projects like apartments and airports to large-scale projects for name-brand hotels.
If you have a project and are confused about fall protection, I’m happy to answer any questions. I can also arrange a consultation, if needed, at no charge. Most projects will be eligible for free designs, so there’s no harm in reaching out!
Pre-Design Preparation
First, you need to know your scope. For this demo, we’ll be doing a hospital that only requires fall protection, not suspension. We will be making one that covers window washing systems in the future, so stay tuned. Until then, we have resources on Pro-Bel's website, and our contact information is in the bio if you have any specific questions.
Alright, now that we know our scope is only fall protection, it’s time to review the relevant information in the drawings.
To design for fall protection, we need the elevations, roof plans, Isometric, structural plans, and details for the fall protection if they were included.
Most regions follow the same guidelines for fall protection, but Canada and some states have slight tweaks to their requirements. You need to confirm if the region you’re working in follows standard protocol for fall protection or not.
Structural Considerations
The structure of the roof will determine both the placement of the anchors and what type of base they’ll require. For wood structures, the anchors can usually be placed anywhere. For cement, they can be cast in place pretty much anywhere on the roof. But for steel, they can only be placed on the beams, which can make it a bit trickier if there’s a lot of interference on the roof.
Elevation Review
Review any elevations that would alter the drop distance. If the roof plan doesn’t encompass all the roofs on the building, you’ll need to merge them together in a separate document to begin the design. Calculate the drop distance on all elevations to make sure all the faces require fall protection.
Parapets
The required height for a parapet, which eliminates the need for tie-back anchors, is 42” from the finish of the roof. This varies in some regions, but that’s the standard requirement for most states.
When a parapet is under 42” and rooftop work is expected to occur within 6 feet of the roof edge, safety & tie-off anchors are needed.
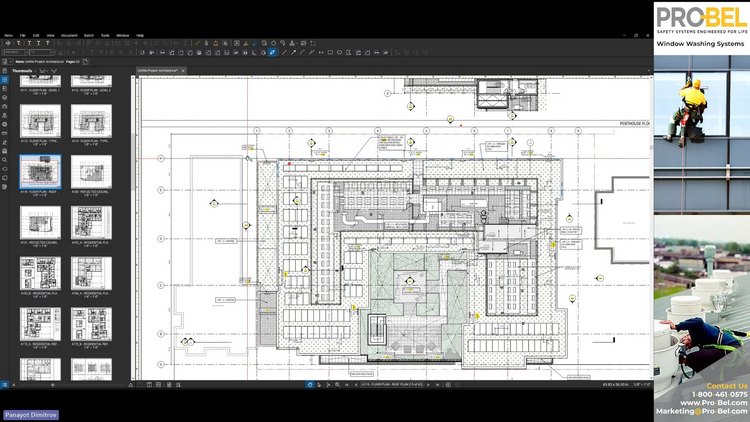
Once you’ve reviewed these factors, it’s time to create a design. Create a new document for the roof plan to initiate the design process. If the different roof elevations aren’t on one document, they need to be merged. Have any relevant documents, such as the roof details, elevations, landscape, if applicable to the roof, isometrics, overall building section and any other plans that would impact the roof.
Fall Protection Design Tutorial
Here’s the document I’ve prepared for the tutorial. This building only wanted fall protection, no window washing or facade maintenance. Before I begin, I must issue a disclaimer that a professional should perform this task. I’ve put my contact information in the description, and I or a separate regional designer can prepare an OSHA-compliant design.
This brief tutorial will cover the basics of how fall protection design operates.
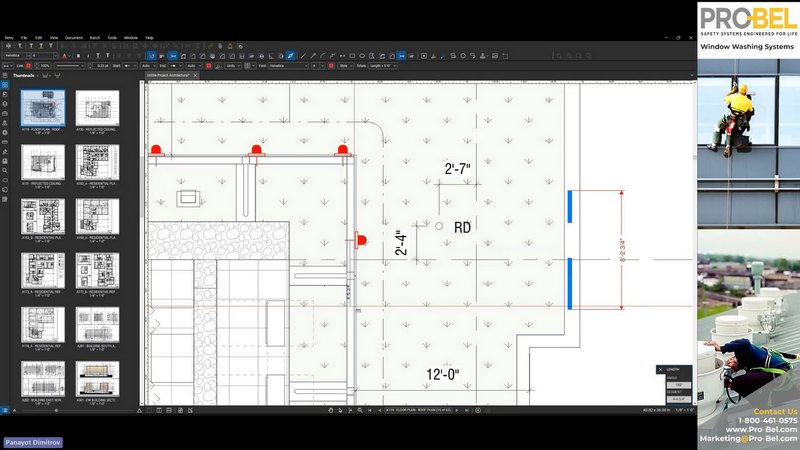
This area is part of the lower roof merged with the roof plan. It’s 13ft from the ground, which means it needs fall protection.
Fall Restraint Requirements
Since we can’t rely on fall arrest for this height, we need fall restraint. The minimum distance is 8 feet 9 inches, but I prefer to put it 10 feet back while getting a feel for the building. The first anchor will go here. The maximum span for a cable is 30 feet, so we’ll need to measure out the lines so they're within 30 feet. After that, we need to add another anchor so the worker can reach this side of the roof. Next, you need to consider the corners. They should be within 6f, of the center anchors. This is because the worker’s lanyard reaches 6ft, and there’s an additional 2ft of arm reach.
Corners are usually one of the more difficult design concepts for people learning fall protection, so it should be reviewed by a professional. Me or any other professional designer can be contacted to review your design work or to compose the design for you which is a free service for any eligible projects.
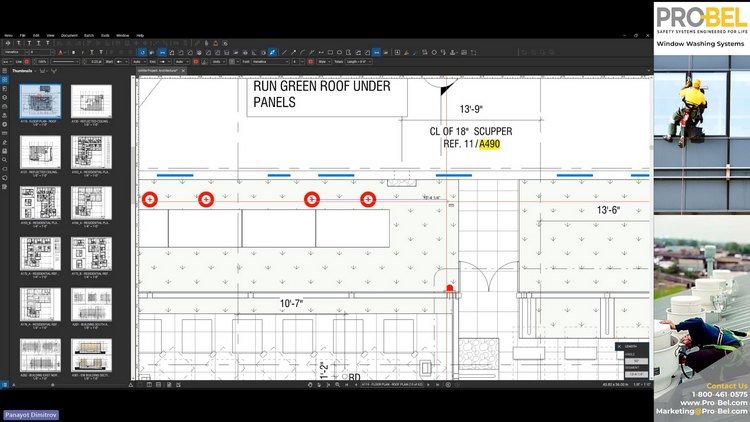
Now because this roof has a wall, we’ll be adding wall anchors along it and measuring them out to be within 30 ft apart.
Designing Anchor Points Around Obstacles
Next, we must create a design that works around these obstacles. The hazard zone is 6 ft from the edge, but since there’s equipment that prevents us from going 6ft back, we have put it closer to the edge.
I’ll substitute the wall anchor here for two roof anchors so they can be connected to the anchors we’ll have to place in the hazard zone. Before determining where in the hazard zone the anchors need to be placed, we need to check which anchors can be placed further than 6 feet to identify the optimal position for the anchors aligned along the edge.
Now, we adjust the anchor placements, the design is within the needed distancing, and all areas of the roof in this section are covered.
Tie-back Anchor and Horizontal Lifeline Placement & Requirements
Since there is less interference at the bottom, we can place them down according to standard guidelines.
The worker can only reach 6 feet from this point, so we’ll need to add two more anchors to reach the bottom portion of the roof. This second anchor can be moved to have a further reach and reduce the cost of the fall protection system.
And we’re going to stop one of our cables here, because our maximum allowable cable distance for a single cable is 300 feet – so instead, we’re going to have a termination point here with a shock absorber over here. It’s a good spot for it since it’s not near any mechanical equipment that the worker would have to traverse around.
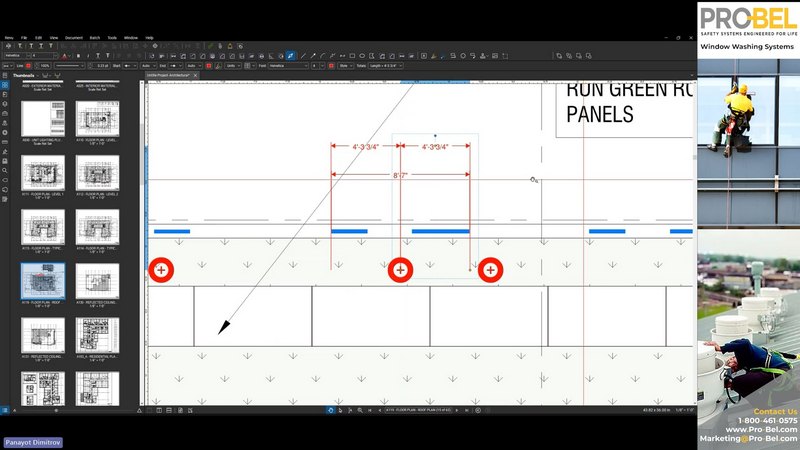
The upper corner of the building is a bit unusual, as it features a snow screen, which is only 5 feet tall. We could potentially attach equipment to it, but it’s not designed for that purpose, and the clients have said they don’t want to design it to take any of our weight. In that case, we will need to use roof anchors along the perimeter between the snow screen wall and the building edge. So, in that case, we’re going to be centring one of our anchor tools using this square tool… and there, we can see it’s lined up perfectly to the perimeter and roof edge now. Then I can do the same on the other side… And because I know that the span is 47’’, I can’t get away with just one, so I’ll need to place three anchors to have the cable length reach.
So, from here, we have a couple of options. We can continue in this straight line, which will utilize a cable system that’s actually inside the hazard zone, meaning there would be no attachment in these spots. So, any person working on the roof would have to either attach to this point down here or somewhere up top and go along. They wouldn’t be able to safely attach to this one on the corner because once they’re along here, they’ll be in a hazard zone and won’t be able to safely work. That leaves us with two choices. We can tell them that’s the situation and to snap onto a cable from a distance, or we can add an extra anchor or two here and have it come along like this.
And so, these would allow me to have an access point here, or here, to attach to the cable, because my fall hazard zone is now within 6 feet of the building edge. Anything in this zone here is a no-go. However, with these new anchors, the worker can stay out of the fall hazard zone.
Then, we will align these anchor points and distribute them evenly. To be sure, we’re going to measure between the anchors to ensure that it’s within the 30 foot rule, and it looks like it is. On the other hand, we’d need a cascading anchor with one here and one there, which isn’t a great design. So instead, in this area, I’m going to take one of my anchors and bring it down. Then I’m going to measure 14’’ here, place the anchor here, and align them all vertically for the best access. Now, the worker can safely run my cable both ways!
So, some other challenges… For this building, we’re going to assume that this lower portion of the building here is almost the same height, at least within 12 feet of the roof. That means we need to terminate the cable system before the roof extension starts and introduce anchor systems instead. The reason for this is that I don’t have enough space due to the mechanical equipment to introduce an additional fall restraint system and reduce the number of anchors. Therefore, to ensure a worker's safety while working on this part, they must be tied off to anchors at a 6’ off-center position for the entire operation. This is common when we have things like bay windows or balconies on the sides of buildings that prevent us from properly arresting the fall due to the lack of space.
In that case, first, we will measure the distance and then go up a size. We’ll go up to 42’ and then center it on the part of the roof that sticks out… add one anchor right here… and we’ll need to make sure that the distance between these two anchors is 6 feet or less. As you can see, the distance is currently over 7’, so that’s obviously a no-go. So I’ll just move the top anchor closer to ensure it’s within the 6’ safe range, and then just realign and space out the top anchors as well to make sure that everything is in line.
So from here, I’m just going to make a line of anchors here in a single line, 6 feet apart each. Now, I’m going to select them all and Distribute Equally Vertically, which will then place them 6 feet apart for each in a nice row of anchors.
Now, we could terminate here and avoid the extra anchor, but as you can see, the equipment on the roof could interfere with the cabling. So, instead, we’ll bring this last anchor up a bit. So now, I’ll measure 7 feet from the roof edge, and then we’re going to create another line of anchors starting from this corner. But, we’re gonna be smart about it – to avoid being closer than the 7 feet, we’re going to instead start by placing an anchor on the other side, like that. Then we’ll make additional anchors, select them, and select 'Distribute Horizontally'… and there we go.
Okay, now that we’re done with that part, we’re going to go back to the snow screen wall. So we’re going to copy one of these anchors and see if it fits in the 30’ limit… no, it doesn’t, but what we can do is just place a wall anchor here, and move this anchor here so it fits within the 30’. The benefit of a wall anchor over a roof anchor is not only that it’s cheaper than a roof anchor, but it also helps cut down on the roof penetration. The fewer times you have to install an anchor, the better, as it reduces the need for roof penetration and waterproofing, among other things. Tying off to additional equipment whenever possible also helps keep those costs down and maintain roof structure integrity.
Now, we’ll proceed to the almost end position and roughly measure about 7 feet. Then, we’ll use the same square trick from before to ensure the anchor is perfectly aligned. Now, this is a long length of roof, so we’re going to do the same thing again as before – 7 feet from the edge to place an anchor, select the anchors, and distribute them evenly along the roof edges.
Fall protection is essential for keeping rooftop workers safe, and a professional must review any design to ensure it is optimal and poses no risks. If you aren’t in the fall protection industry, give me a call or email. I’ll review your building, and I can set up a consultation with a lead designer if you’d like. My contact information is in the bio below.
Share this Post